In this guide, we aim to implement a Remote Development Environment following the official GitLab instructions.
Our practical example involves utilizing AWS to set up a custom DNS, while employing a Windows machine with Docker Desktop to host the container as the remote environment.
Importantly, this configuration can be generalized to be executed on Linux/MacOS machines, AWS EC2 instances, and even other DNS providers.
Once the implementation is complete, we will conduct a comprehensive evaluation of GitLab’s Remote Development System. This assessment aims to provide insights into the maturity of the system, enabling readers to make informed decisions about its suitability for their development workflows
Table of contents
Open Table of contents
- Architecture
- Resources
- Walkthrough
- DNS Setup. Creating A record pointing to remote environment
- CertBot. Generate SSL certificates
- Remote Environment. Docker container creation
- Fetching Access Token from the Remote Environment Container
- Opening Ports and Firewall Rules
- Establishing Connection. Connecting GitLab WebIDE to the Remote Development Environment
- Conclusion
Architecture
Before delving into the details, let’s outline the key steps in our journey to establish a seamless connection with the remote development environment via GitLab’s WebIDE. The following steps break down the architecture, making the process comprehensible and accessible for a smooth implementation
- Connectivity via GitLab WebIDE:
The primary goal is to establish a connection to the remote development environment using GitLab’s WebIDE. - Secure A Record URL:
Generate an A record pointing to our Windows host to serve as the URL for connecting to the remote environment via the WebIDE. - Ensuring HTTPS Security:
Utilize CertBot to obtain SSL certificates, ensuring that the connection to the remote development environment follows the secure HTTPS protocol. - Docker Container Launch:
Launch the Docker container, acting as the remote development environment, within the Docker Desktop application on the Windows host. This container is ready to receive instructions.
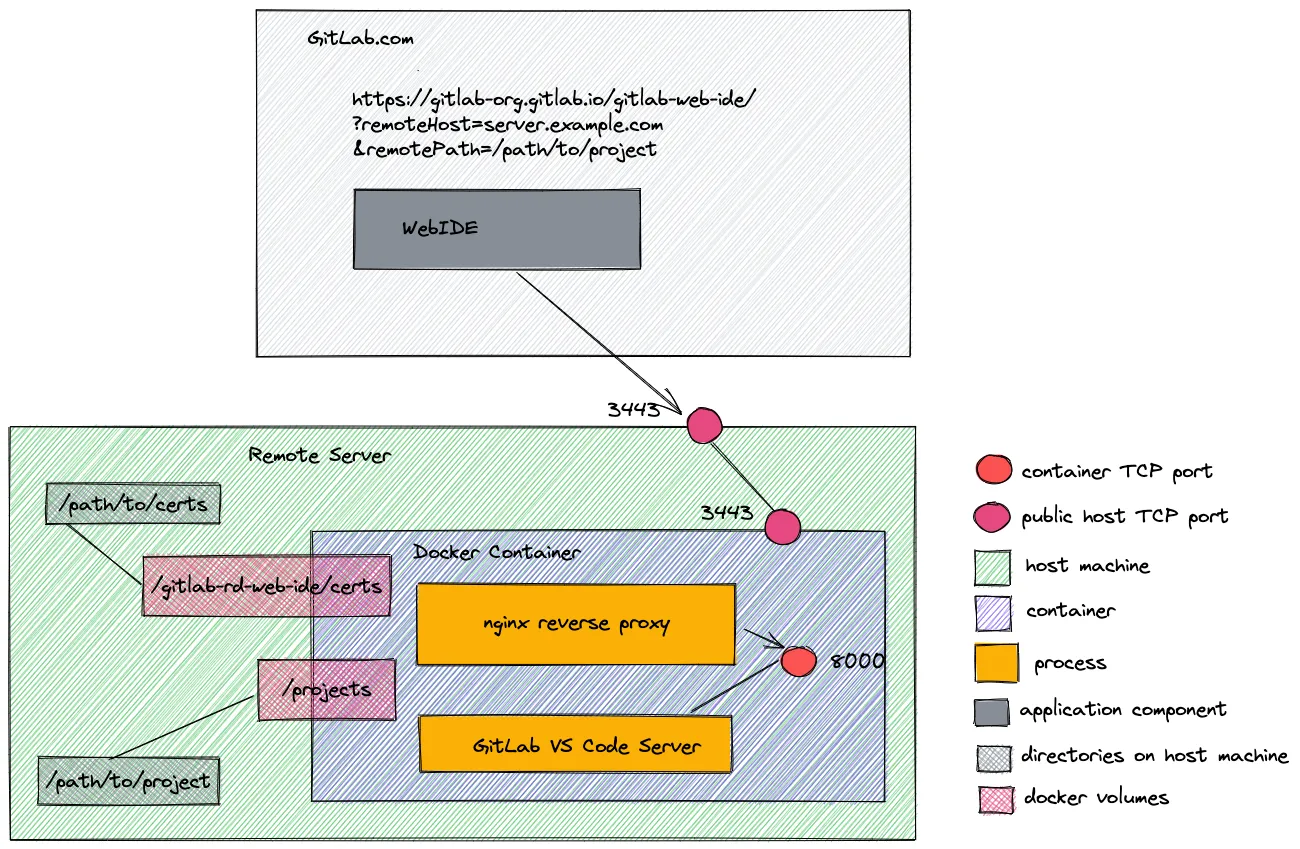
The following diagram shows the general architecture to implement in this post:

And the following diagram, taken from the original gitlab repo, shows the internals of the remote environment container:
Let’s skip the wait and start making it happen. Time to turn this architecture into a reality!
Resources
Our walkthrough for implementing GitLab’s Remote Development Environment (Beta) requires a few key resources to ensure a seamless setup.
- As you follow along, make sure to keep these three links (link1, link2 and link3) handy for quick reference in the GitLab documentation.
- Ensure you have a fully operational AWS account to leverage its versatile cloud services.
- Additionally, install the CertBot for efficient management of SSL certificates.
- For the containerized remote environment, a Windows machine with Docker Desktop installed serves as the ideal host.
It’s worth noting that while we specify certain tools and platforms, many components in this walkthrough are interchangeable. Users can opt for alternative solutions or systems to achieve a different final architecture, maintaining the core principles of GitLab’s Remote Development intact. For instance:
- Instead of using AWS Route53 for DNS registration and management, GoDaddy, Google Cloud DNS and many others could be used instead.
- Instead of using your local Windows host for hosting the remote environment, a separate machine could be used with different OS, and even a cloud compute service like AWS EC2 could be used instead.
Walkthrough
Before we proceed, it’s important to note that this walkthrough isn’t an exhaustive step-by-step guide but assumes a certain level of familiarity. We’ll highlight the crucial steps with enough notes to guide you through the process.
DNS Setup. Creating A record pointing to remote environment
Registering a DNS Domain with AWS Route 53:
Begin by registering a DNS domain through AWS Route 53 service. This pivotal step establishes the foundation for your remote development environment’s URL.
Creating an A Record for Initial Setup:
Once your domain is registered, create a concrete A record within it. This record will serve as the internet reachable reference that will be used to get the remote environment’s IPv4 address. For simplicity, you can use any IPv4 address at this early stage of the walkthrough, such as 10.0.2.2. However, if you want to save some time, then use directly the public IPv4 of the host machine that you will use to execute the remote environment docker container.
Important Considerations:
Keep in mind that domain registration typically incurs costs. Be cautious about potential charges, especially regarding automatic renewal of the domain.
CertBot. Generate SSL certificates
With the DNS domain and A record established, the next crucial step is to secure the connection with HTTPS.
Utilize CertBot, a powerful tool to generate the necessary SSL certificates for this task. These certificates will play a pivotal role in establishing a secure HTTPS connection to the remote development environment. Once generated, they will be stored within the Docker container, ensuring the ongoing security of the connection.
This process enhances the overall security of your remote development environment, providing a robust and encrypted connection for your development activities.
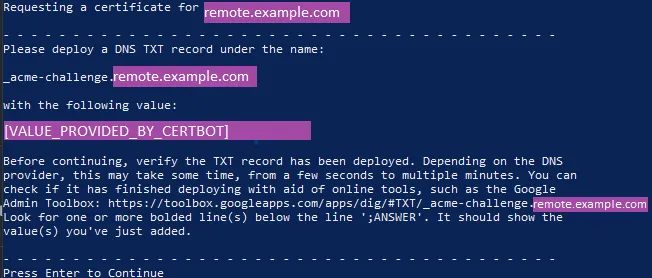
CertBot is a versatile tool offering multiple configurations for secure connections and SSL certificate generation. In this walkthrough, we’ll specifically employ the DNS Challenge approach. This method requires creating a TXT record within the registered DNS domain, with a designated name and value.
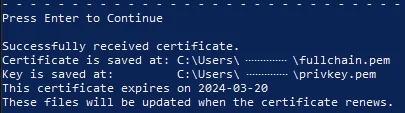
certbot -d remote.example.com --manual --agree-tos --register-unsafely-without-email --preferred-challenges dns certonlyExecuting the previous command initiates the CertBot process. During the program execution, CertBot will prompt you for the creation of the TXT record, a crucial step in the DNS Challenge method. It’s imperative not to proceed with the CertBot execution until the TXT record is successfully created. Once the TXT record is in place, allow a grace period to ensure its propagation across the internet. Only after this waiting period can you safely continue with the CertBot program. Upon completion, CertBot will generate the expected SSL certificate files, namely fullchain.pem and privkey.pem.
Here you can see a couple of screenshots of the Certbot execution process in my PowerShell terminal:
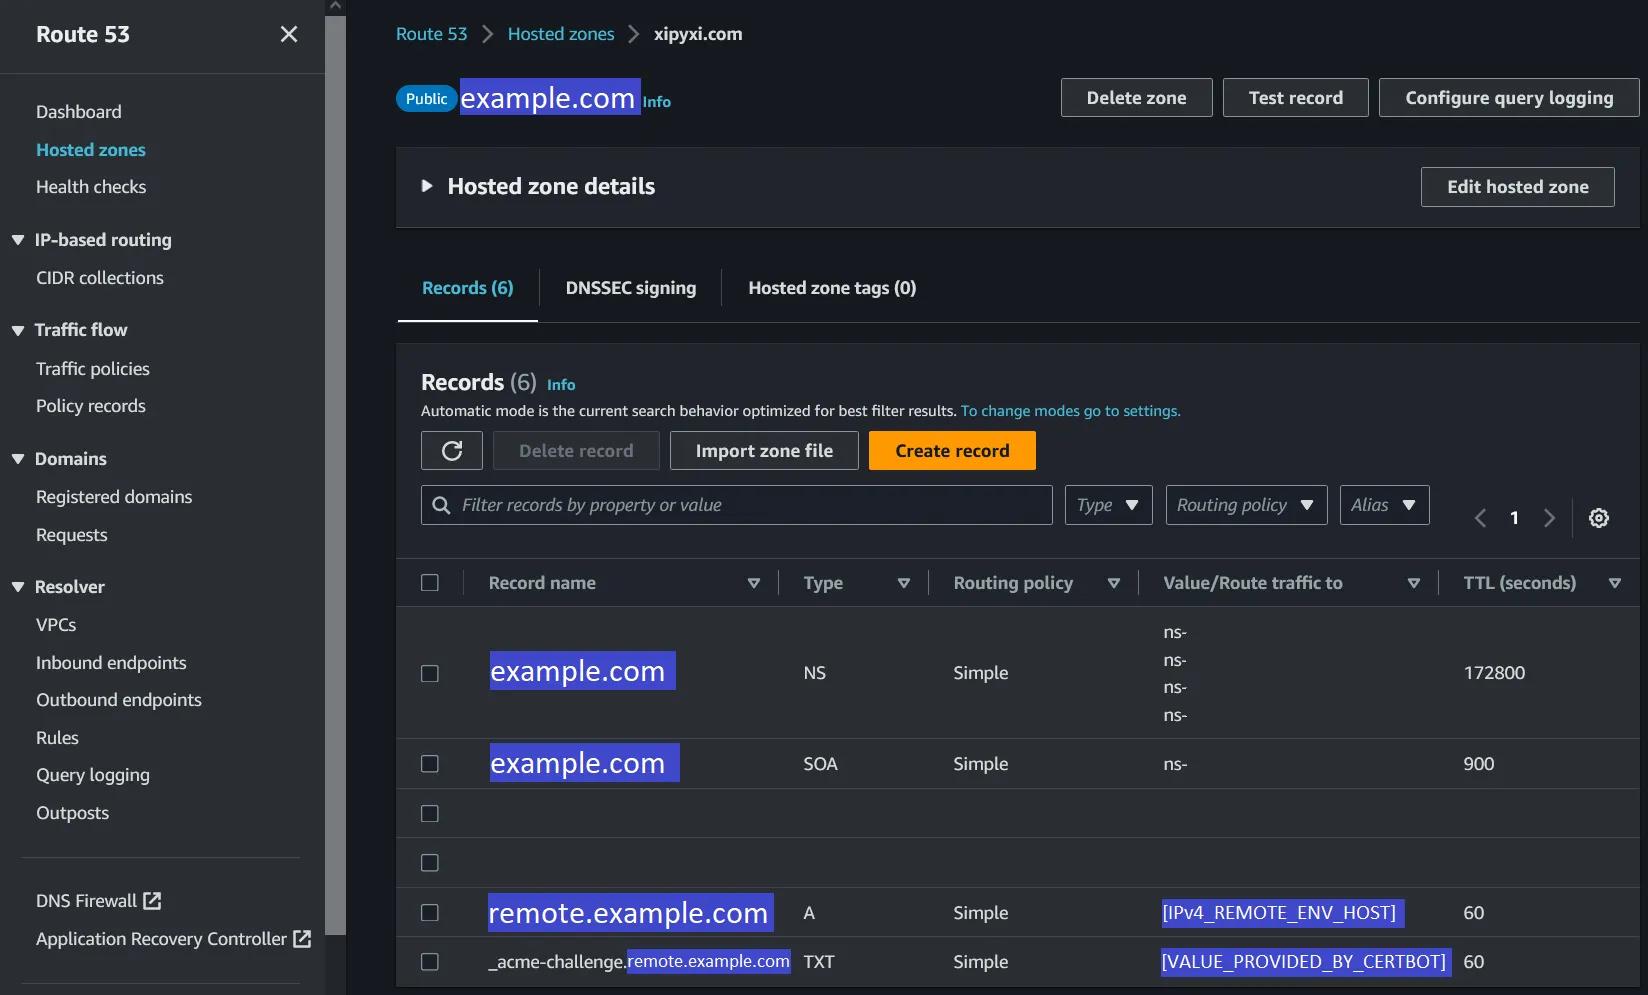
And finally, here you can see a screenshot of how the Route 53 Hosted Zone should look like after the creation of both the A and TXT record:
Remote Environment. Docker container creation
Before diving into this step, confirm that Docker Desktop (or an equivalent for your operating system) is installed. Next, gather the certificate .pem files generated by CertBot and place them in the same directory. Additionally, create a separate folder for your project files. These preliminary steps lay the groundwork for launching the official GitLab remote environment container.
Now, execute the following command to initiate the container setup. It’s crucial to note that the container utilizes port 3443, so ensure that this port is available and accessible on your system.
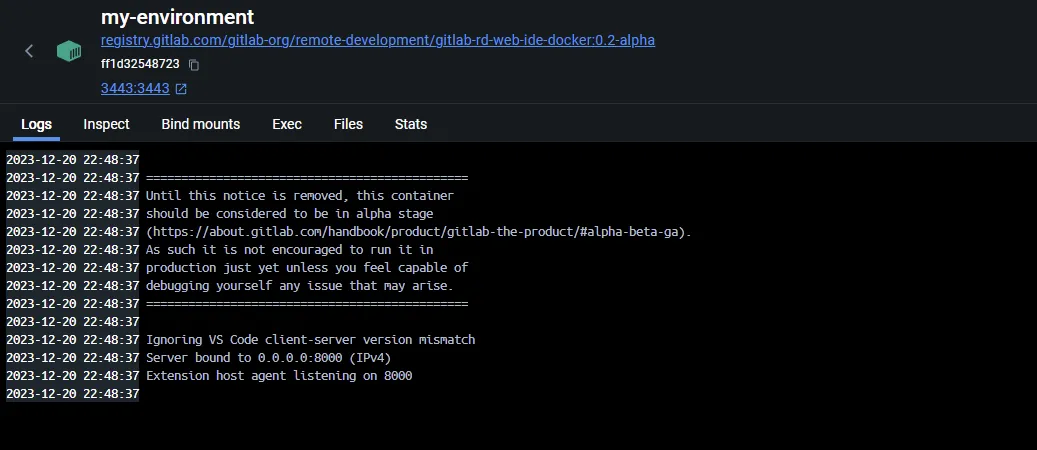
Upon the successful instantiation of the GitLab remote environment container, gaining insights into its logs and internal structure can be enlightening.
The logs, showcased in the following screenshot, offer a glimpse into the container’s activities, providing valuable information for troubleshooting and monitoring.
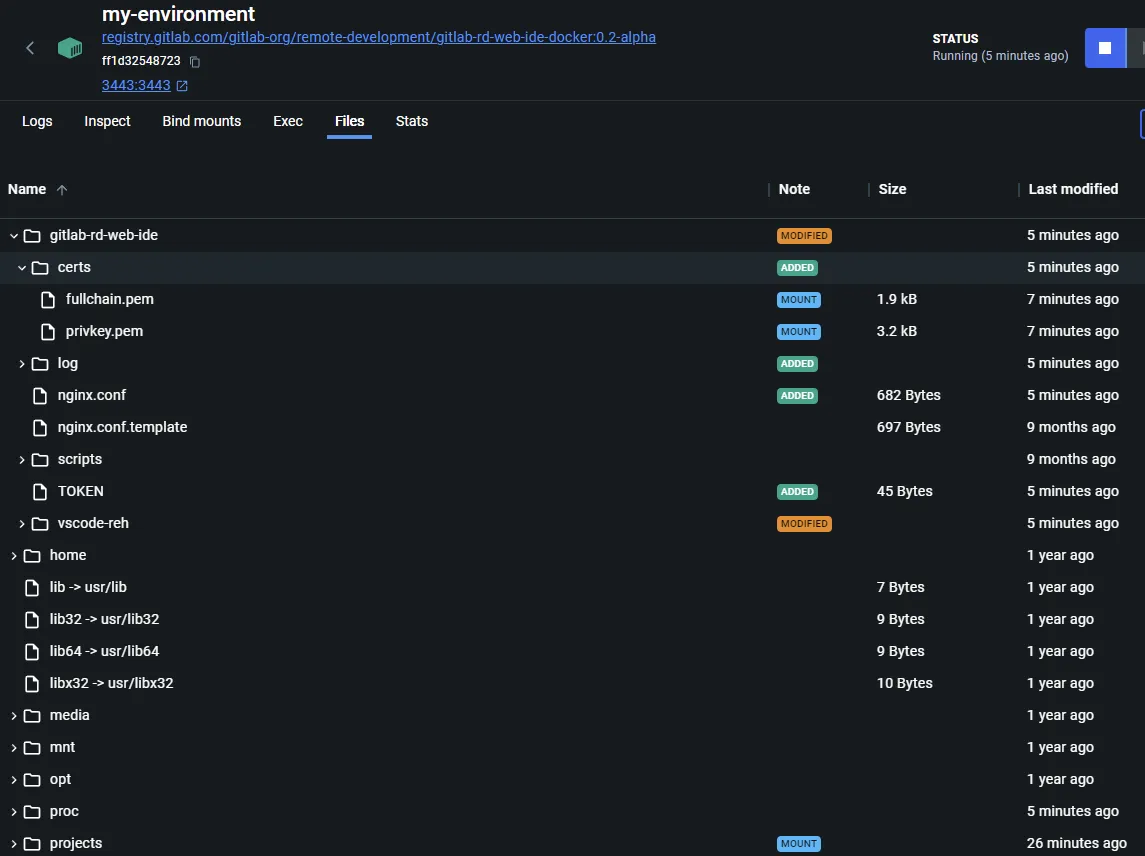
Furthermore, peeking into the internal folder structure reveals the meticulous organization within the container. Notably, the mounted folders for certificates and project files are clearly visible. This visual representation offers a quick overview, ensuring that the essential components are correctly integrated.
Fetching Access Token from the Remote Environment Container
To gain access to the GitLab remote environment, you need the access token that was generated during the container’s initiation. Retrieve this token effortlessly by executing the following command.
Remember to replace my-environment with the actual name of your GitLab remote environment container. And also to copy the returned TOKEN into your notes so that it can be used later.
docker exec my-environment cat TOKENKeep in mind that this access TOKEN changes every time you start the container.
Opening Ports and Firewall Rules
Before connecting to the remote development environment, it’s crucial to ensure that the necessary ports and firewalls are configured correctly.
If you’re hosting the container on a personal Windows machine, verify that the Windows firewall is appropriately configured. Additionally, open the relevant router ports (3443 mainly) to facilitate external access.
For those utilizing an EC2 instance on AWS, meticulous configuration of security rules and Network Access Control Lists (NACLs) is essential.
In any scenario, whether on a personal machine or in the cloud, taking the time to set up the correct network configurations guarantees seamless accessibility to the GitLab remote development environment from the internet.
Establishing Connection. Connecting GitLab WebIDE to the Remote Development Environment
The final step involves establishing the connection from the GitLab WebIDE to the remote development environment container. Follow these straightforward steps:
- Open the terminal in the GitLab WebIDE, which will resemble the layout depicted in the following screenshot.

- The remote environment URL will be requested. So just use the registered domain as well as the configured port, in our case
remote.example.comand port3443.
remote.example.com:3443- When prompted for the project folder within the remote environment container, use the same folder as configured during the instantiation of the container. In our case, the path is
/projects.
/projects- Input the previously fetched access token when prompted. This key step ensures a secure and successful connection between the GitLab WebIDE and the remote development environment container.

Congratulations! By successfully navigating through the steps, you’ve now established a seamless connection to the remote environment. Well done!🙌
Conclusion
After thorough exploration of GitLab’s Remote Development Environment, it’s evident that the platform is still deeply embedded in its beta phase. Notably, the suggested Docker image remains largely unchanged since late 2022, lacking substantial updates and offering limited language and tool support out of the box. Compounded by usability frictions, launching the remote environment from the GitLab WebIDE doesn’t automatically transfer the working repository into the container, requiring manual cloning, an inconvenient and user-unfriendly process.
It’s also worth noting that GitLab offers a GitLab Workspaces Beta product, which may present a more polished and potentially user-friendly alternative. However, given its status as a paid product, it has not been explored in this post. While it may provide a more refined experience, it’s essential to set expectations accordingly. It’s plausible that Workspaces Beta may offer improved user-friendly features, yet it’s unlikely to introduce revolutionary enhancements beyond what other competitors already provide. As with any evolving product, periodic exploration is encouraged to stay abreast of updates and improvements.
In summary, GitLab’s beta solution falls short compared to competitors, as it lacks essential features readily available in other offerings. While it may show promise for those willing to manually configure every aspect of the remote experience, including building the image from GitLab’s provided instructions, it remains a less convenient and feature-rich option. As of now, it is what it is, an experimental product.
As we wrap up this exploration of GitLab’s Remote Development Beta, it’s valuable to consider alternative solutions in the dynamic landscape of remote development environments. For a brief comparison and insights into other major players in the industry, check out my post Solo Development made easy with Remote Development: GitHub vs GitLab vs Gitpod vs DevPod. This comprehensive comparison provides valuable insights, allowing you to navigate through diverse options and make an informed decision tailored to your remote development preferences.